Monday, June 28, 2010

Stephanie's Boobholder

I needed a warm cardi or jacket to wear out last saturday night ... it was only saturday morning that I realised I didn't have anything in my wardrobe to match the rest of my outfit. I had some stash yarn that was the right colour and was thick enough to knit up fast, but even so, I thought it was abit much to think that I could complete it in an afternoon! (but of course, I had to give it a shot :D) ... so, armed with my 2 balls of Katia Himalaya, Stephanie Japel's Boobholder pattern, a cup of tea (several actually!), and some old Taggart re-runs on TV, I set about knitting :D
Ta-daa! ... five, non-stop knitting hours later, it was finished (I even had a perfect button in my stash!). I wore it on saturday night, over a black long sleeved skivvy ... it fits great and feels great, and kept me nice and toasty warm on a cold Adelaide night :)
(The only changes that I made to Stephanie's pattern were to eliminate the puffy sleeves, and to decide, by trying it on, when to divide for the body and sleeves)

Monday, June 21, 2010

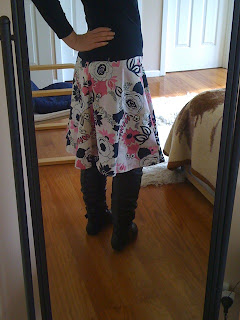
That 70's Skirt

Browsing through some old sewing patterns at the op shop, I found a little book dating from about the 70's, containing heaps of miniature dressmaking patterns. Not knowing what it was, I did a quick Google search, and discovered the world of Lutterloh :) It seems like such a cool, clever idea ... you take just two body measurements (bust and hips), and using the Lutterloh measuring scale, draft out the patterns from the miniature schematics. The book I bought was Supplement number 135, and didn't come with the scale ... however, I ordered the current Lutterloh complete system(which includes the patterns, instructions and more importantly, the scale tape) :)....so here we have skirt pattern number 105 (from supplement 135)... the illustration was a bit vague so I wasn't totally sure how it would look (or whether it would fit!), but unbelievably, using only my hip measurement, it turned out great and was really easy to draft :) I can't wait to make more!

Sunday, June 06, 2010

Sweater vest weather

I thought that it was about time to make some more winter warmies :)
....so... my first attempt at a sweater vest for the littley of the family came out 'a tad' too big, lol (I think that it can be
packed away until at least next year...forward planning don't ya know ;D). I took the measurements from my 16 month old grandson's shop-bought vest, did all of the calculations, and used the instructions from Barbara Walker's Knitting from the Top. It was a really easy, seamless knit, think my mistake was not allowing for the huge amount of ease in stocking stitched knits ... ah well, least I know that for next time :)
For the second attempt, I used my Knitware software to be sure of a better fit ... success!...it does fit better, but it also has hilariously funny armholes that make him look like he's wearing shoulder pads :D


...and just to finish off the green-ensemble...a pair of Sucky Thumbs from Marianne's awesome pattern (fast, easy, and they fit! ... thanks Marianne :))

Sunday, April 11, 2010

From drab to ...

... well, pretty fab actually ;D
I joined the online Cut Out and Keep community and found some really good tutes, this one being my favourite so far :)
This project was so quick and easy that I didn't even think to take before shots ... basically, these were old t-shirts (in my bag of
clothes destined for the Goodwill shop), sliced up the middle and threaded with elastic or ribbon, to make awesome shrugs ... really, could it be any easier? I don't think that I'll ever be able to throw away a t-shirt again ... these are so cool :D

Wednesday, March 31, 2010

Engineered in reverse!

So....I don't know whether to feel a bit good because I managed to copy an awesome baby's jacket from Big W's latest winter range,
or whether I should feel a bit bad for 'stealing' their idea ... (there is a bit of redemption in the fact that the yarn I used was bought from their store!?!) ... anyhow, imitation being the greatest form of flattery and all that, my daughter asked if I could make her a jacket similar to this one in the new Big W catalogue ... (sorry for the blurriness). I already had all of the yarn except the orange in my stash, so after viewing it in the shop, I went home and set about knitting :)
There were some things that I hadn't
tried before ... the knitted on hood with the back 'seam' increases, the zip and placket, and the curved diagonal pockets. I'm really happy with how they all turned out, other than the hood is a little too pixie like (something that I can work on next time). I made this 'test' jacket in a small size (about 6 months), and have now started a bigger one to fit my grandson, who
will be about 18 months when the colder weather arrives in Adelaide. I love what I've learnt along the way, and now have plans to tweek the next jacket to get it just right :)
(In my enthusiasm to get the jacket finished, I forgot to write down all of the construction notes, but this is what I remember of the basics: I used 8ply yarn on size 4mm needles, knitted it top down from the neck edge starting with 54 sts, divided into 24 for the back, 12 for each front and 3 for each sleeve. I increased until there were 52 for the back, 26 for the fronts and 31 for the sleeves. Each colour bar has either 2 or 4 rows of reversed stocking stitch. The body from the underarm is 26 rows, and the same for the sleeves. The pocket started at the top with 8 sts, increasing 1st at rows 7,11,13,15,16,17,18,19,20, then worked straight for about 8 rows. The neck stitches were picked up for the hood, with a stitch marker in the centre back, and then an increase stitch either side of this on every other row, until the hood was the correct width (my first attempt was pretty bad, or actually pretty good if it was being made as a Christmas Elf costume! My second attempt was slightly better ... but not heaps ;D)
... sketchy details I know, but hopefully enough to get some more made :D)

Wednesday, March 10, 2010

Not quite ready for Lift-Off yet ...

... but we're getting closer :)

The progress so far on my Rocket Man quilt :)
The applique is nearly finished, which will then just leave the quilting. I'm going with a really easy running stitch with embroidery floss, just to outline the applique, and maybe a few of the pieced stars :) I'm really loving making this quilt ... Lift-Off will follow shortly!!

Wednesday, February 17, 2010

Enid does it again


After making this, my second Enid Gilchrist dress, I feel confident to try all of her patterns ... and really, the options are endless!
I'm still amazed, every time that I look through one of her books, with just how much design information they contain (and each time I look and read, I seem to find something new) :) My mum used to make all of our family's clothes when we were kids, and I know for sure that had we lived in Australia and had access to these books, I would have been dressed Enid style since a baby :) ... guess I'll just have to make up for lost time now :D
...so, onto the specs: This was the Magyar dress on page 28 of Junior Teens and Smaller Women. The bodice was drafted from the pattern, but the skirt was just the rest of the fabric gathered in at the waist. My favourite part of this dress is the cool scooped neckline and shoulder seams ... I thought that it might be a hard dress to wear (thought maybe the magyar underarm seams may be restrictive), but that doesn't seem to be the case at all :)
Again, it was all made from stash. The fabric and zip were from a Spotlight shopping session way back. My only purchase was the tiny white belt from Factorie for $2.50 ... it just needed that small finishing touch. Not a bad price for a new summer dress :)

Tuesday, February 09, 2010

Rocket Man


I started making this cot quilt for the Little Star Man of our family :)

It fits in great with my stashbusting because I wanted it to have a really scrappy look ... plenty of tiny little pieces to use up on all of those free-pieced stars!
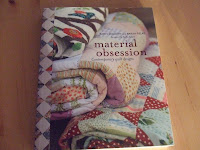
The pattern is from a book that I received as a pressy some time back, called Material Obsession.

The pattern is written for a pre printed panel to go in the centre, but I decided to go with applique for mine instead ... so far I've got up to cutting the applique shapes out of paper, and getting the placement right ... the next step is to decide on which fabrics to use :) The main inspiration for the rocket ship came from this awesome free applique from Kellie at Don't Look Now (thanks Kellie, it was just what I needed :))
...and ... I think that I've just found a great soft toy to accompany this quilt ... (that is so me, planning my next project before I'm even close to finishing this one!!) :D

Monday, January 18, 2010

Bibs and Bean Bags

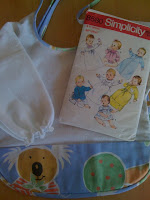
I was looking for some quick little projects to use up some small scrappy bits of fabric, and found this really cool bean bag tutorial ... I love the idea of having throwing, counting games :) These bean bags not only helped with reducing my fabric stash a tad, they also helped with my pantry clear out, using a packet of pretty old lentils that had been forgotten about! (Each bag took half a cup) :D


The bibs were made from an old, 1971 Simplicity baby pattern (another Op Shop find). I doubt that this pattern differs at all from its modern day equivalent (other than its awesome 20c price tag!) ... I love to use patterns that have been used
before, especially all those years ago! ... its cool to imagine who made it and what their fabric choices were like etc. My favourite pattern finds are the ones with handwritten names, notes and corrections on them
... it's made me think that I might start slipping a small photo of my finished projects inside the pattern envelopes, so that in many years to come, when my patterns are doing the Op Shop circuit again, the new sewers can see exactly what has been done before :)

Tuesday, January 05, 2010

My first Enid Gilchrist


I totally doubted this pattern all the way through ... first I thought the neck would be too wide, then the armholes too small, then the facings too fiddly, then the waist too small and too high up ... the list goes on! But, after lots of thoughts of abandoning this dress completely, I decided to go with whatever Enid said, and followed her instructions to the full (thats very not me!).
... I don't know how I could have ever doubted!!! The dress fits great, the instructions were clear, and no part of it was fiddly or hard ... I have
now got SO many Enids to catch up on :D
The bodice was the basic sleeveless one from page 8 of Basic Fashions for Women (reduced to one size down using the instructions in the back of Teenagers and Small Women), and the skirt was just basic, gathered at the waist.
And I'm glad to say that it was all made from my stash ... fabric, thread and zip :)

Tuesday, December 29, 2009

Getting started with my Enids

I 'discovered' an old Enid Gilchrist book in an Op Shop a couple of years ago (Play Clothes for Children, costing 20c). Since then I've been collecting her books ... some from Ebay, but mostly from op shopping. I've managed to collect quite a few, ranging from baby patterns right through to adults. There seems to be a lot of baby books around, but not so many for women ... I guess that people find it easier to hand-draft the smaller clothes (personally I love the adult ones as the fashions, dating from about the '50s, are awesome :)) I've even managed to double up on a few of her books, but other than sending one to fellow collector Tracy, I thought that I'd hold onto them as spares (most of them are falling to bits anyway ... it's so cool that they've been well used :)
So,after a million attempts to take my measurements and agonise over which size I was, I drafted the basic pattern (I knew that all those excess rolls of christmas wrapping paper would come in handy!). Now either my body measurements were not taken too accurately or there is a lot of ease calculated into the patterns, because I needed to go down a size from what I thought. Just to make sure that I had the size right, I quickly made this
dress in scrap fabric (without facings,
turnings, zips etc), and I'm very pleased to say that the fit is perfect:)
Now to find some cool (matching!) fabric, to make my first Enid for real ... I can't wait :)

Sunday, December 20, 2009

The easiest fruitcake recipe ever!

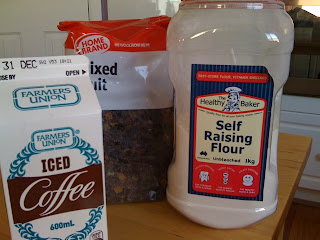
I don't usually make a Christmas Cake ... there's only two of us in the family that eat it, and a whole cake seems like too much hassle (and too much on our waistlines), so I tend to have a tiny shop bought one, albeit usually dry and pale and not very Christmassy ... buuuuut, this year will be different ... I found a recipe for the easiest, richest fruitcake ever :) It was so easy that I'm thinking of making another one to ice and have as a centre piece on the table on Christmas Day. I made this one today, and of course, HAD to cut into it to see how it tasted ;D (Now that it's cut, I might use some of it to make Christmas cake ice cream and maybe some rum balls) ... anyways, here's the recipe, (and don't be put off by the small ingredient list!)

1kg dried fruit
600ml iced coffee or iced chocolate
2 cups self raising flour

Soak the fruit in the iced coffee in the fridge overnight (you'll know when it's been long enough when all the liquid gets absorbed)
Stir in the 2 cups of flour
Place in a large greased and lined cake tin, and bake at 180 degrees for an hour and a half
...that's it!!
I'm thinking that with my next cake, I might swap the iced coffee for Baileys, just to make it a bit more festive, but still less boozy than a traditional cake :)

Tuesday, November 03, 2009

Still de-stashing

...yes, the de-stashification process is still going strong :-) It has been hard to stop myself from adding to my supplies (I came very close to caving in at Spotlight this morning!)... buuut... so far, so good :-D
It took me a while to figure out what to make with my two lonely balls of Sean Sheep Armytage. It's too scratchy for baby things, and far too prone to accidentally felting for a teething, drooly bub (although it would have made an awesome looking earflap hat!), so in the end I settled on my old faithful,' go to when in a knitting funk pattern', the One Skein Wonder. I followed the pattern without modification, phew!!, and it pretty much saw all of my two balls :-)

I made a few pairs of toe-up socks. The white pair here were made with some old 'no label' acrylic, and the pink ones were Lincraft Cosy 8 ply wool. They're basically the same sock, 8 ply yarn with 4mm needles. Turkish cast on (12 sts) increasing to about 24 (or whenever the sock fits snuggly over your toes), work straight in any stitch (on my lace pair, I did plain stocking stitch on half the stitches, for the sole). I tried a Short row heel this time, instead of the Afterthought one, and really surprised myself with how easy it was, although I do need to practice it more to eliminate the little holes on either side. After the heel it was just ribbing on all stitches until I was happy with how they felt on :-) I found this elastic bind off, which made a heap of difference to getting the socks on and off!
....and finally, I attacked my fabric stash, and started making random quilt blocks...not sure what I'm making with them yet, but I'm pretty sure that a baby quilt will be following shortly ;-D

Friday, August 21, 2009

Just using what I've got ...

...seriously, I need to stop buying yarn and fabric! I do know that I have tried this before, but this time I'm going to try really, really hard!! I have got so much stuff that it's gonna take me forever to use it! I'm on a definite mission to drastically de-stash - use what I've got as far as possible without going to the shops. I guess the only exception will be to buy buttons and things to finish off items, but I will try my hardest to make do :-) (I'm slightly worried that Big W will do one of their annual yarn sell-offs soon to make room for the summer stock, and if that is the case, I'm not sure that I can resist buying 50c balls of yarn!!!... but, we will see) :-D


...so, to start me off, I made a couple of things from my stash :-) The sweater actually started off as a Bad Penny, but after wearing my other one for a while, realised that I didn't like the wool so close to my neck ... too itchy, so I frogged and used the yarn to make this basic top down, scooped out neck version instead (this time I just made the pattern up as I went along). I still love the Bad Penny pattern, but just not with the Sean Sheep Armytage that I was using. I thought that I only had 5 balls of yarn, so I just knitted down until I ran out (I then found another ball in my stash, after it was finished, but by then, I couldn't be bothered to lengthen it. I just tend to tug at it now if it rides up :-D) The bag was made with some fabric oddments that I got from a local sheeting seconds outlet (Talking Textiles at Christie's Beach) ... at the time, I think I got 10 various sized pieces for $1. Not bad, a bag for $2! The free pattern is here. The only thing I will change on it next time, will be to place the internal pockets nearer to the bottom of the bag. Other than that, it's perfect ... comfy to carry, great size, especially since South Australia banned all plastic check out bags from supermarkets. My everyday bag now has to be big enough to fit in my small shopping bags and my Woolworths roll up ones ... oh, and I quite often have a nappy, bottle and dummy to carry as well :-D

Tuesday, July 21, 2009

Retro Baby

After I finished knitting this cream coloured hoodie, there were a few things about it that I thought could be better ... so, not to let it beat me, I did some tweaking to the pattern, and came up with this blue stripey (and much improved) version :-) ... really!, I'll use any excuse to do some more knitting!! The main thing that I wanted to change was the front neckline, as it came way too high, making the top button sit scarily close to mouth level (the top button is undone and flipped back on the modeled photo). I also tapered the sleeves on the first one, but then found it hard to get them on over his other clothes ... sooo, the new and improved hoodie now has, a scooped out neckline, non tapered sleeves, and I also made it a bit bigger to allow for a wriggly baby! :-D

RETRO BABY ... (so named because it made me think of my Mum's patterns from the '60's!)
I made it to fit a 6 month old, which the cream version does ... the blue one knitted up bigger, just by upsizing the needles. Basically, the two patterns are the same (other than the parts mentioned before) The cream one was knitted Top Down seamless, and the blue one was done Bottom Up seamless ... there was no real reason for this, guess I just needed a change! :-) The hood is not seamless, but I'm sure that it would be fairly easy to change ... soooo, here's the improved pattern :-)
The pattern I am writing is for Top Down, but changing it to bottom up is easy ... just start with 80 stitches for the body, and23 for each sleeve.

The size is roughly 6 months
The gauge is 13sts x 24 rows to 4"using 6mm needles with 2 strands of yarn held together (cream), and 12.5sts x 18 rows to 4" using 7mm needles, again using double yarn (blue)
I used 3 100g balls of Carnival 8 ply acrylic (gotta love Big W!)

TOP DOWN
Using yarn double throughout, cast on 18 stitches.
Knit the first row placing markers after stitch 1,2,16,17
Working in stocking stitch, increase both sides of the markers on every knit row, work 7 rows
On next row, also increase at beginning and end of row
Purl 1 row
Remembering to increase still at the raglan seams, cast on 8 stitches at both ends
Keeping the first and last 4 stitches in garter stitch throughout, work 3 more rows in stocking stitch
Buttonhole row, knit to last 4 stitches, k2tog, yfwd, knit 2
Work 5 more rows stocking stitch
Work stitches to first sleeve, put sleeve stitches on holder, cast on 4 stitches, work to the second sleeve, put sleeve stitches on holder, cast on 4 stitches, work to end
*sorry! there seems to be a mistake here ... it should read 20 rows of stocking stitch and 6 rows of garter stitch before the cast off* Work 13 rows stocking stitch, keeping garter edges, placing buttonholes at rows 25, 35, and 45
Cast off
Return sleeve stitches to needles and cast on 2 stitches at either end
The sleeves can either be knit flat and then seamed, or knit in the round (I did mine in the round using magic loop)
Work 26 rows stocking stitch
Work 4 rows garter stitch
Cast off
For the hood, cast on 63 stitches
Work 4 rows of garter stitch
Work 5 rows stocking stitch
Decrease one stitch each end of next row, then every following 3rd row 5 times
Work 1 row
Cast off
Close up any underarm holes, sew the back hood seam together, sew the hood to the jacket neckline, and finally, sew on the buttons :-)
The hood turns out pretty big, but I like that because his other hats still fit on underneath it, (and I think that most of the time, the hood will just be for show). If you wanted to change the size of it, just cast on a few less stitches, but work the same amount of rows to make sure that the hood and neckline match up.
Don't forget to post any finished piccies on Ravelry! ... would love to see them :-)


Friday, July 03, 2009

Quickie Mini Mitts

I wanted some baby mittens to match the hat that I made a couple of weeks ago ... I tried about 4 or 5 different patterns, but none turned out how I wanted them to look ... so I thought I would try taking the parts of each pattern that I liked, do some knitting pattern fusion, and this is what I came up with :-)

Quickie Mini Mitts

This pattern fits about a six month old, but with it being a top down pattern, it's really easy to adapt to whatever size you want (just continue the increases until it's the right width, and then just keep trying them on until the length is correct).

The yarn and gauge don't really matter either ... I used Moda Vera Harmony with size 5mm needles, which knitted up to 18 stitches and 24 rows.

Using Emily Ocker's cast on, cast on 8 stitches.
Knit 1 round.
Knit front and back into every stitch.
Knit 1 round.
Kfb, k6, kfb, kfb, k6, kfb.

Knit 1 round.

Kfb, k8, kfb, kfb, k8, kfb (24 sts)
Continue knitting around on these stitches for about another 13 rows (I used the magic loop method).
K1, yarn forward, k2tog across the next row (eyelet row).
Knit 4 rounds.
Purl 1 round.
Knit 1 round.
Purl 1 round.
Knit 1 round.
Cast off.
Make two wrist ties to thread through the eyelets, and one long connecting cord to attach both mitts. I found that the easiest and neatest way, was to do a simple crochet chain, but an i-cord or ribbon would do the same :-)
(Emily Ocker's cast on is awesome ... I've been trying to get my head around it for ages, ever since I read about it from Elizabeth Zimmermann ... I just couldn't figure it out from Elizabeth's instructions, so googled it, and came up with the above link ... really it's heaps easy and really effective ... I also found a version used for starting crochet circles, which is pretty much the same thing ... it's called the
Magic Adjustable Ring)


Wednesday, June 17, 2009

Warm ears and cosy sleeps ...

Finding a hat pattern to perfectly fit a baby's head is not that easy ... finding an online hat generator however, to design a hat in your own yarn, and to your own measurements, is as easy as clicking here :-D ... how cool are those ear flaps?! I thought that I'd made some sort of mistake whilst I was knitting it... having never made (or worn) ear flaps before, I imagined the flaps to be exactly opposite each other, but (very cleverly) they're not, they are positioned a lot nearer to the back than the front. The result is a hat that fits so well, that it doesn't move about, or need adjusting every few minutes ... love it! ... my only change to the pattern was to do a few less rounds in the main body of the hat ... other than that, I followed the pattern (surprised eh?! ... yep, me too!)
I finally finished a baby quilt that seems to have been waiting around forever. The top is all machine pieced, so that really didn't take too long ... the waiting was just for the quilting to get started (but as soon as it was, it only took a few days to complete). I placed the quilt top directly onto the backing, and hand quilted it, using 3 strands of embroidery thread. I'm not sure what the backing fabric is called ... it's got a really soft fleecy/furry kind of feel (it's the same fabric that heaps of this seasons dressing gowns are made out of) ... I'm sure it's got a name, but I just didn't think to look when I bought it from Spotlight ... maybe I'll remember to check next time I'm there :-D (but, whatever it's called, it's soft, warm, and very snuggly ... and perfect for this Adelaide winter)