Showing posts with label stash. Show all posts

Sunday, June 05, 2011

The Super Birthday Sweater

I can't begin to tell you how much I love this Super Birthday Sweater from Blue Alvarez! It's the first top down pattern that I've seen that divides the neck edge cast on stitches into quarters as apposed to thirds ... it kinda put me off making it for a while, thinking that it might sit funny when it was on, but I've gotta say that it's totally awesome :) Fits great, sits great, was as easy as, and best of all .. I followed the pattern without changing anything ;D (well, other than omitting the middle stripe!) ... oh, and it's a freebie :)
I used 9 balls of Moda Vera Shiver from Spotlight, (some of which I frogged from a previous sweater) and size 7mm needles. It was really fast to make, beautifully written, and has inspired me to try more top downs with the quarter divisions ... love it :)

Sunday, May 29, 2011

Take one thrifted tablecloth, Part 2

The good thing about buying manchester instead of fabric off the bolt, is that it goes such a long way ... definitely value for your buck (especially when it's thrifted!) :)
After making my dress out of the tablecloth I bought from Savers, I still had heaps left to make some much needed aprons. I couldn't decide on waist or full length, so of course, ended up doing both :D
The pattern for the waist length one came from Cath Kidston's Sew! book, the only change I made to the pattern was not binding the pocket top ... the tablecloth had a neatened edge, so I saved myself a step by utilising that instead.
I did the same thing on the hem of the full length pinny ... I love this pattern, especially the way that the curved side edges wrap around the back giving maximum coverage :) The pattern is called the Patternless Kitschy Apron by Jordana Paige and its a freebie from here
...ok, guess I'm off to do some cooking now then :D

Wednesday, April 27, 2011

Green monkeys from Ikea


Thanks to an extra long Easter/Anzac Day public holiday (5 days, woohoo!), I was able to get down to some serious making :)
So I finally finished the tiny baby quilt that I've been working 'off and on again' for the last few months now ... it's a really simple 'cheats' quilt, purely because I couldn't bring myself to cut up the super cute Ikea fabric :D (I love those crazy green monkeys, lol)
It is just Ikea animal fabric on the top, and Ikea red/orange striped fabric on the bottom, with all of the animal designs outlined with 3 strands of embroidery thread :)
I also made a whole heap of baby and toddler hats (most of them have already been gifted, but I'll try to get photos of them soon).
These are two hats that I made from the Ann Budd Handy Book of Patterns that I borrowed from the library ... I love the accessories in this book, knitted from a clever little gauge/size grid. Looking forward to trying the mitts and socks :)
I was intrigued by the sweater pattern, but after getting about half way through knitting one for myself, I decided that the pattern was just a bit too much 80's ... you know, big armholes shapeless body, so decided to frog it and make this Super Birthday Sweater instead. Easy top down knitting and hopefully a nicely fitted shape :) I will try another Ann Budd one soon, because I do like the pattern format, but next time I'll probably stick to a toddler one :)

Wednesday, April 06, 2011

Half a Gargantuan Melon!

I've been looking for a while for some warm winter hats for the little-ies in our family ... I thought that ribbed ones would be a good way to go as the circumference fit doesn't have to be perfect, and they would also allow room for growth. Looking through Ravelry, there were heaps to choose from, but I really liked this one because of the awesome decreases :)
Most were either circular, or swirly or kind of scrunched to have a pom pom on the top ... thought that this one looked more boyish :D
The pattern, Gargantuan Melon, is written for an adult sized, extra large head, so instead of using bulky weight yarn and 6mm needles, I halved the yarn thickness by using 8 ply and used a 4mm needle. It was a bit of a guess as to whether it would fit or not, but the end result was perfect :) I followed the pattern exactly other than starting the decreases after 5 inches instead of 6.25 inches.
I love it! ... there will be more of these hats to come :)

Friday, February 25, 2011

a joint input skirt

This skirt has to be the easiest skirt ever :) I used a pattern to make it, but next time I think that I'll just wing it ... it's a circular skirt with shop bought ribbing for the waist.
My sister
went on an op shopping trip, and bought me back this awesome new Hobbylock overlocker (thanks sis!). Being as it was pre threaded with black cotton, I searched around for something to try it out on ... I found the white and black fabric that my daughter no longer wanted, along with her circular skirt pattern.
An instant, joint input project, that resulted in a really cool, easiest ever skirt :)

Wednesday, February 02, 2011

Girly things

.... so here is the reason that I've been a slack blogger of late ... a brand new grandbaby :) ... pretty good reason don't you think ;D
It's been good to make some girly things, there are so many awesome things to make (notice her cool 'itty bitty baby dress' from this post) ... I love it!
I would have liked to be making tiny knitted cardies and hats, but unfortunately, long sleeved woolens are not of much use for an aussie summer baby, but I did love this Confection Shrug pattern. It's a bit big, but totally cute (and practical :))
And thanks to Kate Atherley for this super-easy training sock pattern. The socks were my first venture into cuff-down, heel-flapped socks. It was so easy to follow, and came out so good, that I'm looking forward to making some adult sized ones ... thanks Kate :)
... and then some sewing :) .... on an op shopping trip a while back I bought some upholstery fabric samples for $5 with the thought of making a quilt ... I loved the colours and designs but decided that the furnishing fabric might feel a bit rough, so instead, we now have a very sturdy, reversible play mat for the new little miss :)

Sunday, October 24, 2010

A dress, or three

Finally, finally, I got around to making my Enid Gilchrist simple empire line dress... I drafted it out and sewed my 'muslin' here ... I don't know why it took me so long to make it for real, but I'm pretty happy with the result :) 
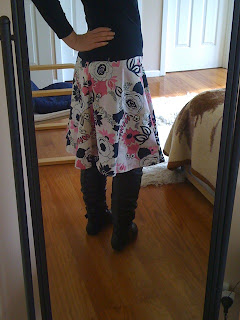
I made a couple of mods to the pattern, making the neck and armholes slightly lower than the pattern ... the neck was purely a design choice, but going on my past experience making Enid dresses, the armholes would otherwise have been a bit tight.Next time, I will also put in a back pleat on the skirt ...standing up is fine, trying to get elegantly into the rear seat of a friends car was no so fine! :D

The other two dresses were mostly made by my daughter ... after nearly finishing them, and then realising that they were too big for her
(and not wanting to be bothered with taking in the seams some),
she gave them to me (minus zip closures and hems) :)
I love them both, but especially the yellow floral one (awesome thrifted sheet from Savers).
For the white and blue one she used New Look 3968 and the yellow floral, Butterick 4980

Monday, September 27, 2010

KCWC Days 5, 6 and 7

I have really enjoyed my week of making kids clothes :)
...my end of week round up is this toddler hoody and baby cardi
Another Kwiksew pattern for the hoody, this time from Sewing for Toddlers. I don't have an actual copy of the book, but the pattern insert was in the babies issue from the op shop (it was good getting an unexpected bonus, feel bad that somebody may have the toddler book without the pattern sheet though!).
...and the cardigan was once again, the 5-hour sweater that I made here ... cut my knitting down this time by not doing the sleeves, but think the 5 hours would have still been a push (didn't think to time it!) :)

Friday, September 24, 2010

KCWC Days 2, 3 and 4

...so, here I am playing catch up :) I've been good with my sewing, just not so good with my blogging :D
This is my Kids Clothes Week Challenge days 2, 3 and 4 (yep, more girly dresses hehe!)
The dress with the orange flowers and tied shoulders is unmistakably the 'itty bitty baby dress', downloadable from Made By Rae (and it's free ... thanks Rae!).
The undies were made in the matching lining fabric from a pattern in the Kwiksew Sewing for Baby book :)
I also got the green sundress pattern from the same book ... It was good using it again ... I bought this copy a few months ago from the op shop, after giving away my original when my girls grew out of it.
...such Grandma fabric don't ya think...teacups and cupcakes, love it!


Sunday, September 19, 2010

Too cute!

... yay! ... we're going to have another grandbaby (a little cousin for the little man), and this time it's a girl :) ... (sooo excited!!). So of course, having just found out her gender, I went straight to Spotlight to buy some little dress fabric, and ... came home with nine different ones! (it was just too hard to choose!). Later I was surfing whilst drooling over the fabric, and found the Elsie Marley blog. Perfect timing, as she is organising the '2010 Kids Clothes Week Challenge' starting tomorrow on the 20th September. It's a really cool concept ... just join a few hundred other crafters working on making kid's clothes for one hour a day for a week ... simple, love it, and can't wait to get started :)
But in the meantime today, whilst planning my weeks sewing, I made these cute as, Baby Janes with some stash Sugar'n Cream cotton (The pattern is by Valerie Johnson and can be found on Ravelry) ... thanks Valerie :)

Thursday, September 09, 2010

Flinders Sweater Vest

I had some balls of Sean Sheep Flinders yarn in my stash from a Big W sale way back, so I thought I would try a top down sweater vest for myself. As I was knitting, the yarn had a really nice, soft silky feel to it ... but ... as soon as the knitting was finished, it started to go baggy and feel kinda lifeless :( I'm not too sure how it's going to bear up to being washed (think I do sort of know the answer though!), which is a real shame because I love the way that it turned out ... and... I'd already started another one the same in pink (I might have to wash the grey one before I decide whether or not to finish the other) ... oh well, it did give me chance to work out a cool sweater vest pattern (and it did only cost me 50c a ball :D)
So for future reference, and a different yarn, here are the specs:
4.5mm circular needle
3 balls of Sean Seep Flinders ... maybe?!
17sts to 24rows to 10cm
Aussie size 8/10 (32/34")
Cast on 62 stitches
K1 place marker (pm) k15 pm k30 pm k15 pm k1
Purl 1 row
Knit increasing either side of marker
Purl
Repeat last 2 rows until there are 9/31/46/31/9 stitches ending with a purl row
Knit to 1 stitch before marker, increase in next stitch
Cast off 30 stitches
Knit back stitches to 1 stitch before marker, increase in next stitch
Cast off 30 stitches,
Knit to end
From here, work with 3 separate balls of yarn
Purl first set of stitches, rejoin yarn and purl second set of stitches, rejoin yarn and purl third set of stitches
Knit, increasing at armhole edge as before until there are 11/50/11 stitches
Purl row
Increase at front edge as well as armhole edge on every knit row until there are 21/60/21 stitches
Now increase at front edge on every row as well as armhole edge every knit row until there are 25 stitches
Cast on 10 stitches, work to end and join fronts
Knit in the round without increasing until work measures 11cm from underarm
Knit 21 pm k20 pm k42 pm k20 pm, knit to end of round
Knit to 2 stitches before marker k2 together, knit to marker, pass marker and ssk (slip 2 stitches purl-wise onto right hand needle, insert left needle into front of stitches and knit them together) repeat the k2tog and ssk at the next 2 markers, knit to end of round
Knit 10 rounds and then a decrease round
Repeat last 11 rounds 3 more times
Knit 2 purl 2 rib for about 4 rows
Cast off
Rejoin yarn to neck edge, and pick up 108 stitches and work 4 rounds in k2 p2 rib
Cast off
Rejoin yarn to sleeve edges, and pick up 58 stitches and work 4 rounds in k2 p2 rib
Cast off


Sunday, July 04, 2010

Quilty bits

Finally, my Rocket Man quilt has made lift-off :)
I had quite a hard time quilting it ... as requested by my daughter, it has a double layer (yep double layer!) of polyester wadding (cold Adelaide nights bbbrrrrr!!). She only wanted the applique shapes to be quilted so that made the job a bit easier ... but even so, I had a few sore fingers for a while :D
So, here is Rocket Man 2010 and I'm happy to say, it is much loved by our little rocket man and his mummy :D

I also finished Fay's quilt ... Fay is my friend's mum, who lives in a nursing home. I made her a lap quilt (about a metre square), just big enough to comfortably tuck in around her legs. I wanted it to be bright and cheery, but not over the top (so I hope that I've got the mix right) ... I also wanted it to be instantly recognisable as her own ... hope she likes it :)


Monday, June 28, 2010

Stephanie's Boobholder

I needed a warm cardi or jacket to wear out last saturday night ... it was only saturday morning that I realised I didn't have anything in my wardrobe to match the rest of my outfit. I had some stash yarn that was the right colour and was thick enough to knit up fast, but even so, I thought it was abit much to think that I could complete it in an afternoon! (but of course, I had to give it a shot :D) ... so, armed with my 2 balls of Katia Himalaya, Stephanie Japel's Boobholder pattern, a cup of tea (several actually!), and some old Taggart re-runs on TV, I set about knitting :D
Ta-daa! ... five, non-stop knitting hours later, it was finished (I even had a perfect button in my stash!). I wore it on saturday night, over a black long sleeved skivvy ... it fits great and feels great, and kept me nice and toasty warm on a cold Adelaide night :)
(The only changes that I made to Stephanie's pattern were to eliminate the puffy sleeves, and to decide, by trying it on, when to divide for the body and sleeves)

Monday, June 21, 2010

That 70's Skirt

Browsing through some old sewing patterns at the op shop, I found a little book dating from about the 70's, containing heaps of miniature dressmaking patterns. Not knowing what it was, I did a quick Google search, and discovered the world of Lutterloh :) It seems like such a cool, clever idea ... you take just two body measurements (bust and hips), and using the Lutterloh measuring scale, draft out the patterns from the miniature schematics. The book I bought was Supplement number 135, and didn't come with the scale ... however, I ordered the current Lutterloh complete system(which includes the patterns, instructions and more importantly, the scale tape) :)....so here we have skirt pattern number 105 (from supplement 135)... the illustration was a bit vague so I wasn't totally sure how it would look (or whether it would fit!), but unbelievably, using only my hip measurement, it turned out great and was really easy to draft :) I can't wait to make more!

Sunday, June 06, 2010

Sweater vest weather

I thought that it was about time to make some more winter warmies :)
....so... my first attempt at a sweater vest for the littley of the family came out 'a tad' too big, lol (I think that it can be
packed away until at least next year...forward planning don't ya know ;D). I took the measurements from my 16 month old grandson's shop-bought vest, did all of the calculations, and used the instructions from Barbara Walker's Knitting from the Top. It was a really easy, seamless knit, think my mistake was not allowing for the huge amount of ease in stocking stitched knits ... ah well, least I know that for next time :)
For the second attempt, I used my Knitware software to be sure of a better fit ... success!...it does fit better, but it also has hilariously funny armholes that make him look like he's wearing shoulder pads :D


...and just to finish off the green-ensemble...a pair of Sucky Thumbs from Marianne's awesome pattern (fast, easy, and they fit! ... thanks Marianne :))

Sunday, April 11, 2010

From drab to ...

... well, pretty fab actually ;D
I joined the online Cut Out and Keep community and found some really good tutes, this one being my favourite so far :)
This project was so quick and easy that I didn't even think to take before shots ... basically, these were old t-shirts (in my bag of
clothes destined for the Goodwill shop), sliced up the middle and threaded with elastic or ribbon, to make awesome shrugs ... really, could it be any easier? I don't think that I'll ever be able to throw away a t-shirt again ... these are so cool :D

Wednesday, March 31, 2010

Engineered in reverse!

So....I don't know whether to feel a bit good because I managed to copy an awesome baby's jacket from Big W's latest winter range,
or whether I should feel a bit bad for 'stealing' their idea ... (there is a bit of redemption in the fact that the yarn I used was bought from their store!?!) ... anyhow, imitation being the greatest form of flattery and all that, my daughter asked if I could make her a jacket similar to this one in the new Big W catalogue ... (sorry for the blurriness). I already had all of the yarn except the orange in my stash, so after viewing it in the shop, I went home and set about knitting :)
There were some things that I hadn't
tried before ... the knitted on hood with the back 'seam' increases, the zip and placket, and the curved diagonal pockets. I'm really happy with how they all turned out, other than the hood is a little too pixie like (something that I can work on next time). I made this 'test' jacket in a small size (about 6 months), and have now started a bigger one to fit my grandson, who
will be about 18 months when the colder weather arrives in Adelaide. I love what I've learnt along the way, and now have plans to tweek the next jacket to get it just right :)
(In my enthusiasm to get the jacket finished, I forgot to write down all of the construction notes, but this is what I remember of the basics: I used 8ply yarn on size 4mm needles, knitted it top down from the neck edge starting with 54 sts, divided into 24 for the back, 12 for each front and 3 for each sleeve. I increased until there were 52 for the back, 26 for the fronts and 31 for the sleeves. Each colour bar has either 2 or 4 rows of reversed stocking stitch. The body from the underarm is 26 rows, and the same for the sleeves. The pocket started at the top with 8 sts, increasing 1st at rows 7,11,13,15,16,17,18,19,20, then worked straight for about 8 rows. The neck stitches were picked up for the hood, with a stitch marker in the centre back, and then an increase stitch either side of this on every other row, until the hood was the correct width (my first attempt was pretty bad, or actually pretty good if it was being made as a Christmas Elf costume! My second attempt was slightly better ... but not heaps ;D)
... sketchy details I know, but hopefully enough to get some more made :D)